Factory Five Racing Forum banner

Started Body Work on #6583

1 reading
162K views 374 replies 78 participants last post by  RichClatk  
#1 · (Edited)
Body Work Progress on #6583

Began a new chapter in my build today. Always thought the economy would be better by the time I got to this stage (and have a professional do it), but here we are. With the proper tools, and over a month of reading books and threads on "How to do your own body work"...here we go.

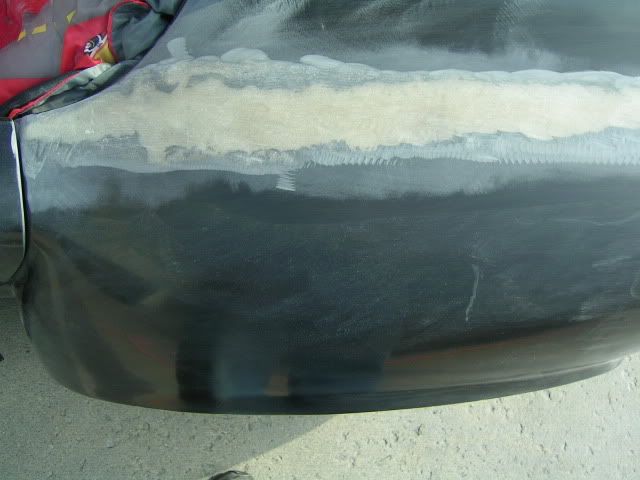
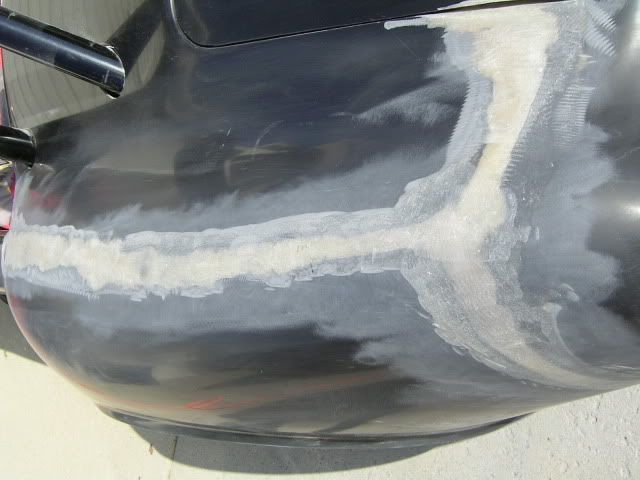
Thought I would start with the rear drivers side quarter seam. Hit it with wax & grease remover, and then did the scotch brite and comet cleaning. Next step was a 4" angle grinder with abrasive pad attachment, started with 60 grit. Eats away those seams quickly. I might add the body is still on the car, so I did this in the driveway to minimze the dust in the garage.

Here it is after the seams are all knocked down. No gel coat stripe in the seams. So I feathered them back a little, found a few air pockets and feathered those out some more. Went back over the whole area with my Random Orbit palm sander and 100 grit just to even out the rough areas.

Image


Image


Image


I've never been much of a patient person...so I sprayed off the dust with the air hose, and got out the filler.
 
#349 ·
Scott, just wetsand the sag/run out and buff it up........... Should be fine.........Steven
 
#350 ·
Scott
It's 5 am and i just rolled into work and i'm checkong for an update.
Good job, don't give up. If you only did 1 run on a first time painting, that pretty impresive... Sand it out.
T.
 
#351 ·
I think this weekend's episode of "Muscle Car", showed how to deal with paint imperfections. If I remember correctly, they suggested letting it throughly dry, then scraping it with a razor blade, then sanding and finally buffing.

Are you going to wet-sand the clear coat then buff it? (I think they demostrated that too)

Looks absolutely FANTASTIC Scott. I bet you stood there and just stared at it for an hour after you finished!

Congratulations.
 
#352 ·
If I remember correctly, they suggested letting it throughly dry, then scraping it with a razor blade, then sanding and finally buffing.
Do you have a link to the show's web-site?

Are you going to wet-sand the clear coat then buff it? (I think they demostrated that too)
I should, but I really want to get the car back together, and the orange peel looks no worse than a new OEM car...so I will probably put the car back together and not do a cut & buff (okay...shoot me now if you want) :p

I'm probably going to try a few techniques on the runs, and then scuff the whole clear coat and reshoot a 3rd coat on it tomorrow night.

Looks absolutely FANTASTIC Scott. I bet you stood there and just stared at it for an hour after you finished!
Thanks! I actually ran like heck to the house once the spray gun was cleaned...took a very cold shower, and drank a beer. Did not look at it again until early this morning before I left for work. That clear coat STINKS! And it's not good for your health :icon4a:

Scott
 
#354 ·
Ha Jeff, that's funny I don't care what they say. Finally had to break open the garage tonight so I could mow the lawn. Don't need a reason (tall grass) for the HOA to come snooping around and write me up ;)

Now that the dust has settled (literally), I took some more pics (still in the garage) of the car. Looks good overall, but I can see that a wet sanding and final 3rd coat of the clear will look even better. The clear coat is really hard to see if you are getting it on correctly in a garage booth environment, I won't kid anyone about this. The overspray fog fills the air and makes it really hard to see your progress.

Well, anyway, how about them pics!

Image


Image


Image
 
#358 ·
Yep...

1st attempt at complete building a car (well sort of)
1st attempt at doing a full body work...(well sort of)
1st attempt at painting an entire car (that's the truth)

To be honest, I've restored 2 classic Mustangs in my past (1966 and 1969 convertible), and previously built a CMC Gazelle 1929 Mercedes roadster kit car (got it to a rolling chassis before I sold it.

On my past projects and daily drivers I have done minor body work and panel repair, and prepped two complete cars for paint before (that Maaco did). This is my first attempt doing a complete paint job, with quality tools and modern paints.

I'm very happy with the results!

I had a lot of on-line and real life "consulting" help from my forum buddies and a few pro's where I work and live. But, I was the only one in the booth doing the work pulling the trigger.
 
#359 ·
Take a stir stick and break it into a 3" piece, wrap it with 1000 grit and carefully saND ONLY THE sag. it will come off. be caREFULL NOT TO GO THRU the clear and stay on only the sag with the stick/1000 grit paper....take your time.......Steven
 
#362 ·
Any updates? I'd love to see a picture of the car fully assembled, and out in the sunlight..:001_smile:

Couple questions.

I keeps seeing ideas on prepping "seams". From what I gather these are not really seams per say, but actually marks left from the mold, (as the body makers were to lazy to prep the mold properly before shooting the gel-coat. Can you simply just not sand these down to the same level as the body, rather than grinding them out, so you have a smooth surface? I don't understand the need to grind them. I have read where it says you need to remove any gel-coat, but the whole body has gel-coat, so...??

If one simply wanted to knock down these mold marks, and shoot the car with primer (for temporary driving), would this cause problems in the future for a proffessional bodyman/painter to do the finish work? Would I be better to simply leave it as delivered till it goes into the body shop? I just though by using a tintable primer, even though it would be flat, it would look better in the meantime.

Can use use polyurethane paint on these bodys rather than the base-clear, (which I think is acrylic paint?). Would the polyurethane react with the vinylester resins used in the body? I have heard poly paint is the toughest for resisting scratches, that's why I had thought of getting it painted in that product.

I may still end up doing the bodywork/paint myself, but I wanted to get a few quotes first, from some pros before deciding.
 
#363 ·
Bill,

To answer some of your questions with my self-taught knowledge (I'm by no means a body man expert).

You could sand down the mold "ridges" we call seams. As you pointed out they are not like those on the older corvettes where panels of the car are glued together, but you are spot on with the description of what this is. It's flash or excess gel coat and layup that fills in the edges of where the different sections of the fiberglass mold come together.

The one problem I experienced with just trying to knock these down is the inevitable "air pockets" and "voids" that get uncovered when you start sanding these areas. The other issue is the alignment of the Mk 3 / 3.1 bodies (still better than the Mk I and II's) you will see high and low spots where one side of the "seam" does not align with the other.

I did not use any HSRF in my prep, and I also did not do the aggressive grinding down into the seams that a lot of builders did with the older bodies. I found no gel coat penetration down into these areas, and simply leveled, then used gold body filler (polyester based) to do the fairing and surfacing.

You could try your idea, but to spray the car with primer, just to drive for a little while is not worth the effort. I would either go all the way, and just commit to doing the body work in the correct stages, or leave the body as is and drive it for a while to work out any problems and then tackle the body work at a later date.

However, if you want to just level and spray the seam area to make it look better, I would suggest using only 2k epoxy primer for this work. People will argue with me that rattle can black primer or paint is okay, but that stuff is inferior, and uncompatible with 2k urethane paints.

I would also stay away from acrylic enamels, lacquers, etc. These cars grow and shrink with the heat and cold, so you really want to use a modern urethane paint for the best longevity of your finish. Urethane is essentially a flowable hardened plastic paint. All of the OEM auto makers use it now, and it virually eliminates the need for flex agent additives.

If you want any more of my advice, for what it's worth, feel free to PM me. I'm still learning, but have learned a lot from what I did with this car.

P.S. - final outdoor pictures of the car reassembled can be seen soon in my "GRADUATION THREAD". For now, this will have to do:

Image


Image


Image


Scott
 
#364 ·
Just awesome.

I'm going to work on mine right now :)
 
#365 ·
Thanks for the advice Scott.
The car is really looking great! Nice to see that it turned out so well, after all the hard work. You must be thrilled..
 
#366 ·
Great job Scott!

I've just got to add a little icing as this thread winds down.

I got to see Scott's car in person at LCS this weekend and as good as the photos look they don't tell the whole story. The body work is flawless. Not a ripple to be found, the cockpit roll and scoop extension look perfect. Excellent color choices; photos can't capture the life and pop that the blue & silver have in sunlight and the splash of red truly sets it off. Scott hasn't cut or buffed yet and still has an easy 9 out of 10 finish! After he does that it will go toe to toe with anything the pros turn out :drool:

Image


Scott has proven that with determination, research and some of hard work it is possible to turn out an outstanding finished product from home! Any of you guys who are on the fence about doing it yourself should use this thread as inspiration. Oh, don't forget to thank him for taking the time to chronicle it all into an excellent guide too! :yes:

Jeff
 
#368 ·
I just finished reading all 10 pages of this thread. I am convinced and itchy (?) to do my body work but am still hesitant about paint. I think your cojones will stay larger than anyone else's here.
Great job and thanks for the well documented thread and inspiration.
 
#369 ·
Since this thread popped up again:

Scott, could you give some more detail on the actual spraying part of this?
How do you get even coverage on all the nooks and crannies of these bodies. Did you lay out a grid of some type and go front to back, or did you do the small, hard to get to areas first then the big areas or what?

Inquiring minds want to know...
(or at least I do)
 
#370 ·
Hey Dallas,

Sorry I missed your post and recent question, and thanks for the PM reminder to check this thread.

To answer your question...well it was really not that complicated.

I have another thread on my actual painting progress as this thread was getting long winded (sorry guys):

Painting Progress for STL-Scott

What I did was to start on the stripes first. Then taped them out. Switched to the body color (silver) and worked from the stripe area out to the side of the body. I think I started at the rear of the car first since that was closest to my exhaust fans. The idea being as the overspray was drawn out of my garage any particles that landed on the car would fall on already wet paint vs. an unpainted area which would cause problems.

You will hear tips on how to do the wheel wells and little crevises that are vastly different.

If I recall, I ended up painting the big areas of the body first and then hit the wheel wells and openings last. For me this helped reduce the chance of overspray runs at the openings.

HTH,

Scott
 
#371 ·
Hey Scott

i am the new moderator i am going to close this thread:wacko:its too long and after i read my posts, i thought did i really type that:001_tongue:
now aren't you glad a couple of home boys pressed you on..................>>>:smoke:
 
#372 ·
Oh...come on Leo, where's your spirit? This thread of mine is almost 1 year old. I think I will keep posting some of my 'cut and buffing' progress to this thread to make a complete sweep of it.

And yes...your typing could use soem wokr...looks wohs taklnig :wacko:
 
#373 ·
my spirit is always there Scotty just thought i would add some more post and give you some Sh!t, and typing i am just great with that the one finger pounds can do 45 WAM :w00t:now spelling it has got to do with how many beers i had after work.
Is work good there for ya in OH10, its been picking up here but still a lot of tradesmen out of work. some have taken jobs in afganistan.