Factory Five Racing Forum banner

Dean's MK4 #9191 Build

17K views 48 replies 10 participants last post by  dhuff  
#1 · (Edited)
i will mot be posting every little thing, but will try to hit the unique and milestones. That said, I will start with some mundane.

Delivery Day, Sept 30, 2017
Image


Pushing it down the street to the house
Image


Body Moved to Buck
Image


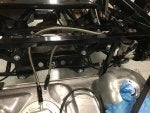
Ready to start Assembly
Image


I'm looking forward to getting started Dean
 
#2 ·
Congrats Dean, good start!
JR
 
#3 · (Edited)
Koni Double Adjustable Front Mounting Location

I purchased the Koni double Adjustable shock option and noted this AM that there are 2 mounting holes available for the top mounts as shown in this pic.

Image


The manuals, forum search, and FFR instruction search did not provide an answer as to whether to use the top hole or the bottom hole. I am using the FFR tubular lower control arms if makes a difference.

Thanks
 
#10 · (Edited)
I purchased the Koni double Adjustable shock option and noted this AM that there are 2 mounting holes available for the top mounts as shown in this pic.

https://drive.google.com/file/d/1vQFqWaEqC53mixAzm8C5fSCPI3wTY6u7/view?usp=sharing

The manuals, forum search, and FFR instruction search did not provide an answer as to whether to use the top hole or the bottom hole. I am using the FFR tubular lower control arms if makes a difference.

Thanks
The bottom hole is used for the red Koni shocks. The top hole is used for the double action silver Koni shocks. Front and back. Which also must be installed with the body down. This was discussed on the other forum and confirmed with a call to Factory Five. Looks like you have them installed that way, so all good.

Front suspension and brakes are complete.
Unfortunately, your UCA's are installed incorrectly. The rear pivots should be on the top, and the zerks pointed up. The pictures in the instruction manual show it correctly, but unfortunately it's never mentioned that it's necessary to disassemble and re-assemble to get the proper orientation. You're in good company. Many have missed this. They come from the vendor assembled upside down for this application. Your upper ball joint is installed correctly, with the ball joint pointed out.

Note: While you're fixing this, it's generally recommend to have bolts go in from the top with the nut on the bottom. That way should the nut ever fall off, there's a chance the bolt will stay in place and avert an even worse situation. When you take the UCA's apart to flip the pivots over, put the bolts in from the other side.
 
#7 ·
The two different hole locations on each side make it double adjustable, right? >:)
The neck on your shock mount looks longer than my earlier mk4, as if it is suppose to be mounted in the upper hole. See attached picture.
Looks like the only difference between the mount holes is a little bit of wheel clearance and a slightly different wheel rate for the same springs. I'd try the upper and see if it works.
 

Attachments

#8 ·
Ah - let's see. dhuff and bhuff. Both from Olathe, KS. Maybe they're related? :wink2:
 
#18 ·
#20 ·
i purchased a new 2004 furl tank and need to identify the parts indicated on the included picture. Does anyone have the part numbers or Ford's name for these parts?

thanks Dean
 

Attachments

#21 ·
Solid quadrant and fire wall adjuster.

Solid quadrant and fire wall adjuster.
 

Attachments

#22 ·
Installed Fuel Return into Tank

Added fuel return to tank. Return discharges into the pump sump to minimize fuel starvation on low fuel levels. :nerd:
Plan to install the tank tomorrow.
 

Attachments

#23 ·
IRS Differential Vent Installed

IRS Differential Vent Installed. Used the stock part, trimmed off both ends to fit. Used the first step of a double flare to bulge the end of the plastic tube to help hold the hose on.
 

Attachments

#24 ·
Fuel Lines Installed

Fuel lines from the tank to the engine compartment are complete. No couplings used.
 

Attachments

#25 ·
Hydo Boost, ABS,and Brake Lines Installed

Hydo Boost, ABS,and Brake Lines Installed
 

Attachments

#26 ·
Hydo Boost, ABS,and Brake Lines Installed

More brake line pics
 

Attachments

#28 ·
Heater Mounting

Choose to mount the heater more substantially that threading self tapping screws into plastic. So, i got some 1/8' x 1/2" steel bar, drilled and tapped for 8 #8 screws. Drilled, tapped, and countersunk 4 #6 screws to hold the bars in place. The 8 screws were put into the bar from the back side with Locktite to keep them from backing out as the nuts are tightened. Also added a piece of bar to fill the gap instead of using a gob of silicon seal as suggested in the instructions.
 

Attachments

#29 ·
Front ABS Sensor Brackets

Started out with the Russ Thompson front ABS sensor brackets but I am using 2007 front ABS sensors which did not fit the Russ Thompson brackets. The 2007 sensors take a 5/16" bolt instead of 1/4", and the flat spot is turned at a different angle from the mounting location. Started by modifying one of the Russ Thompson brackets and decided that a winder piece of aluminum would be needed. The pictures shows the 2 Russ Thompson brackets (on the left) and the 2 that I made, and a mounted sensor.
 

Attachments

#30 ·
E-Stopp brake with T56

Anyone use an E-Stopp parking brake with a T56? I have a later MK4 with Wildwood’s. There are 2 brackets that the cables can go through. I was considering cutting off the front one to push the E-Stopp as far back as possible. Would that provide sufficient clearance?

Thanks