
Has anybody considered trying to keep air charge temps cooler? My aluminum intake tube sure gets hot due to heat soak. Almost too hot to touch. This is what got me thinking. Thought about using composite tube of some sort but I really like the look of the polished aluminum. Decided to leave the aluminum and instead fabricate a cold air intake setup to help reduce temps and maybe squeeze out a little more power and torque. Anybody have other solutions or considerations? Curious to see what others have done.
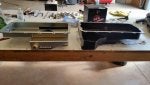
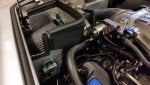
As usual projects always expand, this one included. This led to maximizing the filter size while I was at it to ensure there was no restriction. I was using the K&N RC-5149 filter which has about 96 square inches of filter surface area. Most of the aftermarket filters for the coyote engine have about 150 square inches of surface area (not including the pleats themselves). The filter seemed undersized and K&N states that they are flow rated to 549 CFM. So I had one made by S&B Filters that increased the surface area to 129 square inches from the 96 sq. in. and with the inverted top it added an extra 21 square inches which brings the surface area back to the sweet spot of 150 square inches. Not a lot of room to get 150 sq. in. in the engine compartment.
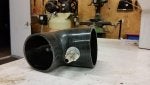
Well, that led to looking at the throttle body as a choke point since the intake tube is 4" diameter yet the throttle body chokes down to 3.5". Off with the stock 80mm throttle body and on with the new 84.5mm throttle body which has a 4" inlet. Now I have a full 4" all the way. Well now a re-tune would definitely be required.
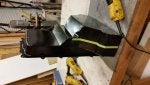
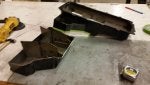
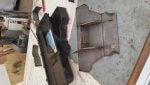
With that addressed, I then got back to the original task of building a cold air box. I used sheet ABS plastic and built a cardboard template and formed up a box and lined it with Thermo-Tec material. Not much room. With that done to hopefully shield the filter from the engine heat, I decided to pipe in fresh air directly into the box. I picked up the fresh air from the driver side brake duct vent and routed it right through the F-Panel and into the newly fabbed air box. Kind of a pseudo ram jet idea.
What started as an afternoon project turned into a 3 week ordeal.
The engine will need to be re-tuned on the dyno and we'll see if I gained much. Currently putting out 419HP/363TQ at the rear wheels. Appt. with my tuner this weekend. We'll see what, if anything, this exercise has accomplished. I'll post tune results.
Stay tuned...
Trevor
As usual projects always expand, this one included. This led to maximizing the filter size while I was at it to ensure there was no restriction. I was using the K&N RC-5149 filter which has about 96 square inches of filter surface area. Most of the aftermarket filters for the coyote engine have about 150 square inches of surface area (not including the pleats themselves). The filter seemed undersized and K&N states that they are flow rated to 549 CFM. So I had one made by S&B Filters that increased the surface area to 129 square inches from the 96 sq. in. and with the inverted top it added an extra 21 square inches which brings the surface area back to the sweet spot of 150 square inches. Not a lot of room to get 150 sq. in. in the engine compartment.
Well, that led to looking at the throttle body as a choke point since the intake tube is 4" diameter yet the throttle body chokes down to 3.5". Off with the stock 80mm throttle body and on with the new 84.5mm throttle body which has a 4" inlet. Now I have a full 4" all the way. Well now a re-tune would definitely be required.
With that addressed, I then got back to the original task of building a cold air box. I used sheet ABS plastic and built a cardboard template and formed up a box and lined it with Thermo-Tec material. Not much room. With that done to hopefully shield the filter from the engine heat, I decided to pipe in fresh air directly into the box. I picked up the fresh air from the driver side brake duct vent and routed it right through the F-Panel and into the newly fabbed air box. Kind of a pseudo ram jet idea.
What started as an afternoon project turned into a 3 week ordeal.
The engine will need to be re-tuned on the dyno and we'll see if I gained much. Currently putting out 419HP/363TQ at the rear wheels. Appt. with my tuner this weekend. We'll see what, if anything, this exercise has accomplished. I'll post tune results.
Stay tuned...
Trevor
")